
Readers like you help support Lifespectrum360.com. When you purchase using links on our site, we may earn an affiliate commission. Read More.
How To Install Notepad++ Spell Check Plugin and Use
In our daily usage of language, most grammatical errors happen because of the wrong spelling of words. Also sometimes, UK English is different from American English. If you are using Notepad++ as your preferred editor, then there is a solution for spell check inside Notepad++.
Notepad++ is a versatile text editor that offers a wide range of plugins, including a Spell Checker to:
- Identifying the words with spelling mistakes.
- Identify only in comments and strings (this is extremely useful while coding)
- Support multiple languages
- Getting suggestions for alternative words in the context
Notepad++ Spell Check Plugin
Step 1: Open Notepad++
Ensure that you have Notepad++ installed on your system. If not, visit our page to download and install it. Alternatively, you can go to the official site to download it. Always download from a trusted source.
Once installation is complete, launch the Notepad++ application.
Step 2: Select Notepad++ Spell check
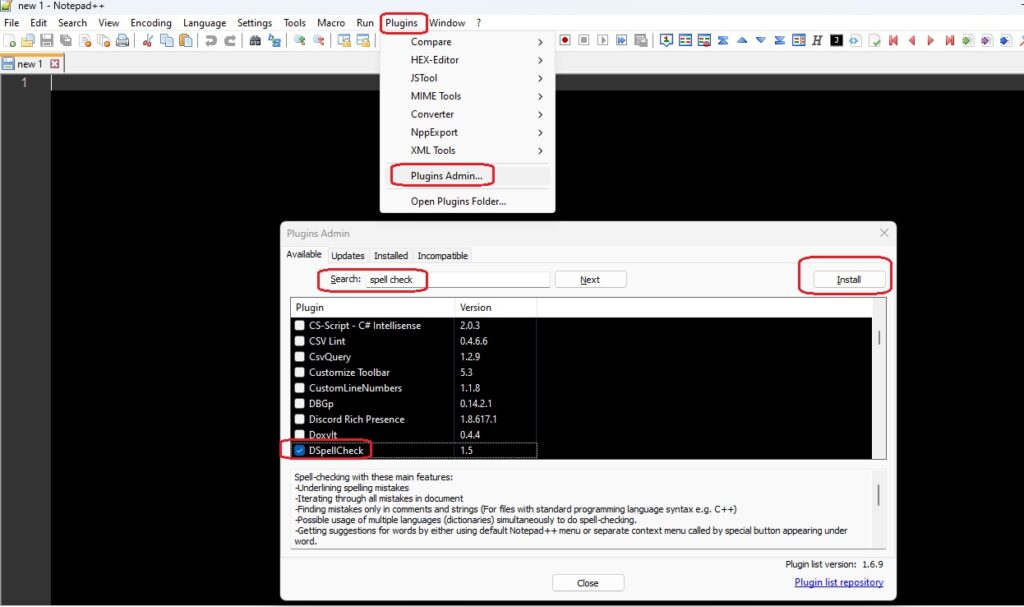
Go to the menu bar at the top and click on Plugins >> Plugins Admin. Alternatively, you can use the shortcut key, Alt + P + P to go to Plugins Admin. A new pop-up window will appear that will show all the available plugins.
Type “Spell Check” in the search, and the “DSpellCheck” plugin will appear in the results. Select the plugin and click on Install at the right-hand corner of the pop-up window.
Tip: Notepad++ constantly updates the plugins to enhance or fix some bugs. The latest version will be shown, this may be different from the one displayed in the picture. So need not worry to install the latest version.
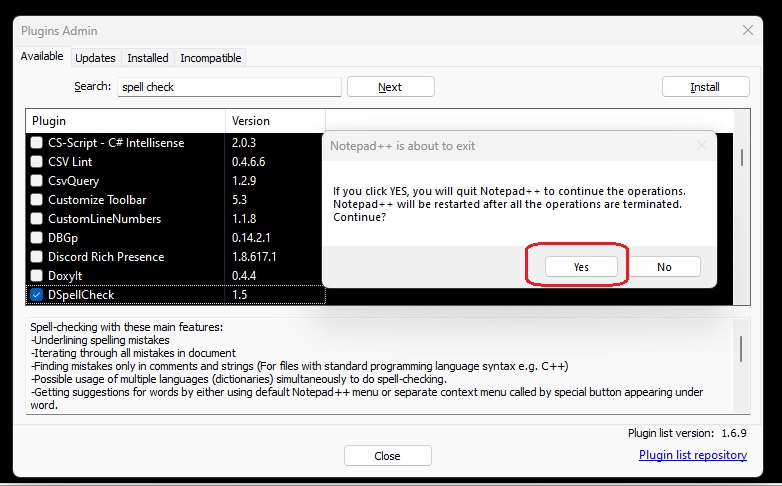
Step 3: Click on "Yes" to Install Notepad++ Spell check plugin
Once you click “Install”, a new pop-up confirming the installation opens up. Click “Yes”, Notepad++ application will be closed, and you will get a Windows notification asking for reconfirmation. Click “Yes”, and the Notepad++ Spell Check Plugin installation will start.
Step 4: Check notepad++ Spell check plugin
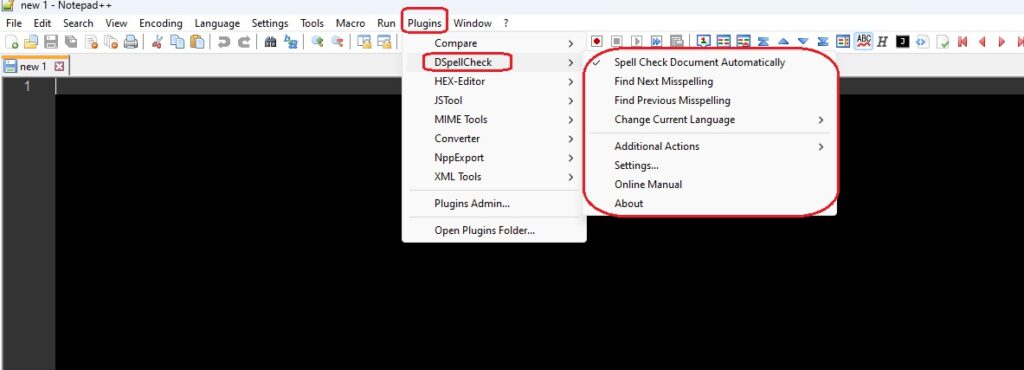
After successful installation of the spell check plugin, Notepad++ will automatically re-open. Go to “Plugins” from the menu bar or type Alt +P, and you will see the “DSpellCheck” appear. If you hover your mouse over it, you will see all the options appear. Verify “Spell Check Document Automatically” option should be checked. If the “Spell Check Document Automatically” option is not checked, then check it.
Step 5: Download The Dictionary
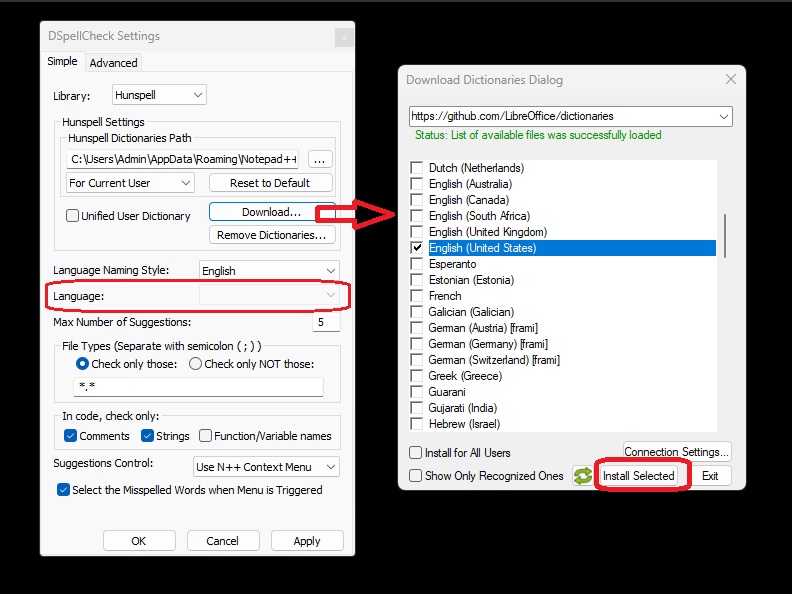
for the first time, you need to download the dictionary. Go to – Plugins >> DSpellCheck >> Settings. The box against the “Language” label will appear blank since there is no dictionary in Notepad++ at this stage. Click on the “Download” button. A new pop-up window will appear displaying all the available dictionaries. Select the one you want.
If you are an international student, a professor, or in a profession related to linguistic work you may need multiple languages. If you are a Korean native working in the US, then you may need both Korean and English (US) dictionaries for work. You can select both languages and click on “Install Selected“.
Dictionaries will be downloaded. You are now ready to use the full functions of the Notepad++ Spell Check plugin.
Step 6: start working with notepad++ spell check plugin
Autosuggestions
The plugin helps you giving suggestions based on the initial letter you are typing. This is helpful especially when you are typing longer words. These words are already used in your document elsewhere and start with same letters you start typing.
Tip: The suggested words may not suit your thought process. so decide the word before double clicking on it. If the word doesn’t fit in the context, then you can safely ignore it.

Spell check and corrections
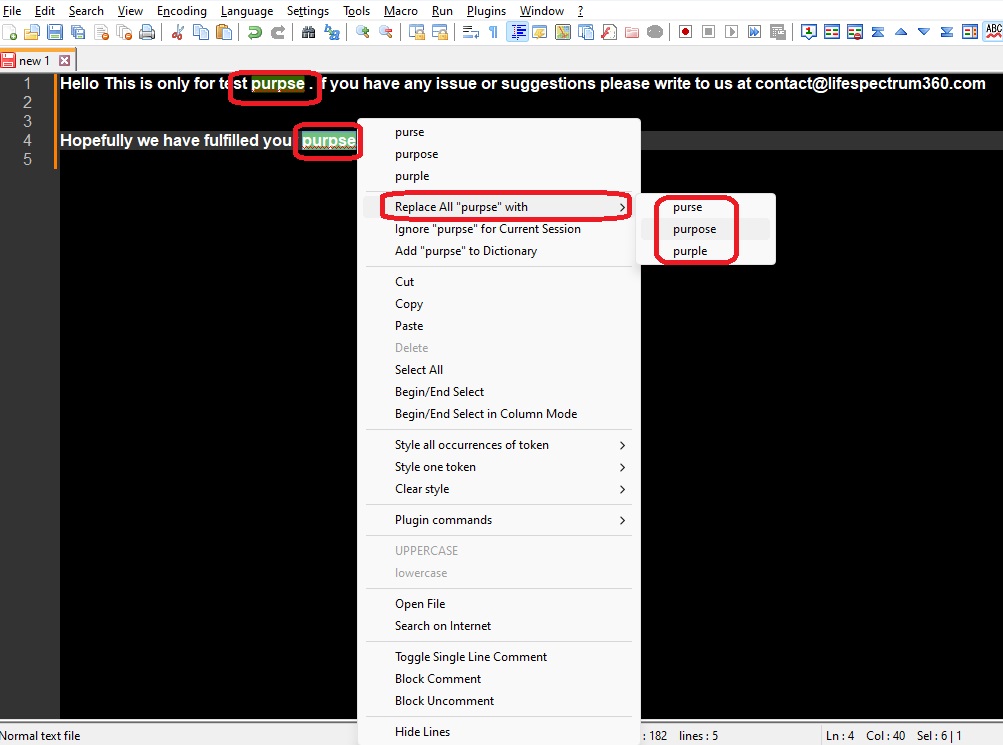
This is the most powerful feature of the Notepad++ spell check plugin. When you are writing your document in Notepad++, the misspelled words will be underlined.
If you right-click on the word where the spelling is wrong, then all the places where this word is used will be highlighted.
- If you click on replace all with, a bunch of suggestions will appear. If you select an option, the word will be replaced at all the places throughout the whole document. Super Easy!!
- If you select the word from the suggested word at the beginning (without going to replace all option), it will replace only the single word.
- Ignore for the current session will ignore the error check for the word in all the places inside the document.
- You can select the complete word and convert to either UPPER case or Lower case.
- If you are editing an existing document and unsure about usage of a certain word and its meaning, then you can directly search the word in the internet. Awesome feature!!
- If you editing a big file, and have already completed editing several lines/paragraphs, then you don’t want to see them. You can use “Hide lines” option to hide them.
These are the reasons why Spell Check plugin is one of the best among all Notepad++ plugins.
If you want to enable dark mode in Notepad++ background for better aesthetics, then read our detailed guide on How to enable Notepad++ dark mode here.
Also, Read our other helpful blogs:
FAQs
What is the Notepad++ Spell Check Plugin?
The Notepad++ Spell Check Plugin is an extension that adds spell checking functionality to Notepad++, a popular text editor.
How does the Notepad++ Spell Check Plugin work?
- This plugin integrates with Notepad++ to analyze the text you’re working on and highlights misspelled words, providing suggestions for corrections.
Is the Notepad++ Spell Check Plugin free to use?
Yes, the Spell Check Plugin for Notepad++ is typically free to download and use.
Does the Notepad++ Spell Check Plugin support multiple languages?
Yes, the Spell Check Plugin supports multiple languages. You can usually set your preferred language for spell checking within the plugin’s settings.
Can I add custom words to the spell check dictionary?
Yes, most spell check plugins for Notepad++ allow users to add custom words to the dictionary. This is useful for technical terms, brand names, or other specialized vocabulary.
Does the Spell Check Plugin work in all versions of Notepad++?
- Compatibility can vary depending on the specific version of the Spell Check Plugin and Notepad++. Always check the compatibility notes provided by the plugin’s developers.
Can I disable the Spell Check Plugin temporarily?
Yes, you can usually disable the Spell Check Plugin temporarily by going to the “Plugins” menu in Notepad++, selecting “DSpellCheck,” and toggling the option to enable or disable spell checking.
How To Change Theme In Notepad++?
Launch Notepad++. Go to Settings >> Style Configurator >> Select Theme >> Select any theme you like from drop down >> Save and Close.
Why isn't the Spell Check Plugin working in my Notepad++?
There could be several reasons why the Spell Check Plugin isn’t working. Ensure that the plugin is properly installed and enabled in the Plugin Manager. Also, check that your text is in a format supported by the plugin’s spell checker.
Is the Spell Check Plugin compatible with other Notepad++ plugins?
Compatibility with other plugins can vary. It’s recommended to test the Spell Check Plugin alongside other plugins you commonly use to ensure there are no conflicts. You can refer to the online user manual for the notepad++ spell check plugin here.